Detailed model with extending fold-down ramp.


At 1:25 scale this model of an aircraft boarding system was only 450mm long but as you can see from the photos we were able to include plenty of realistic detail including scaled down branding and and even a fold-down ramp. The finished model also came with a clear Perspex cover and a foam lined transportation case.
Illuminated model for horse therapy product.


The client for this project wanted an eye catching model they could use as a promotional tool at an event in Saudi Arabia. They wanted to showcase their product, a vibrating floor system, in a typical high end stables setting and asked us if we could come up with a design. As a starting point they gave us a hand drawn floor plan for the stables and we took it from there. We developed this fully realised 3d representation including battery powered lights to bring the model to life. We also provided a sturdy travel case with customised foam inserts to protect the model in transit.
Vets Practice - 1:25 Scale
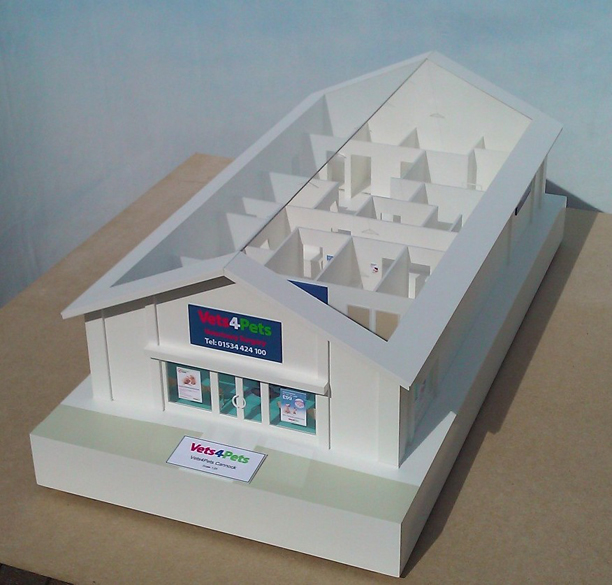
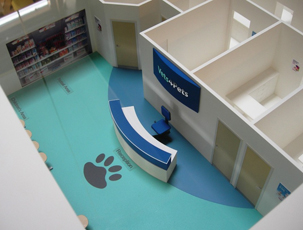
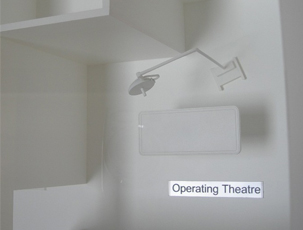
For this project the client, a chain of vets, wanted a portable model that showed the typical internal layout of one of their newly built practices. We suggested this 1:25 scale stylized model because it offered plenty of recognizable internal detail but was easily transportable at only 800mm long. Rather than have a removable roof, we made the roof panels out of clear acrylic to allow easy viewing of the internal detail (this also keeps the dust out). Whilst it is predominantly a white stylized model, we added highlights of realistic colour to add extra visual interest.
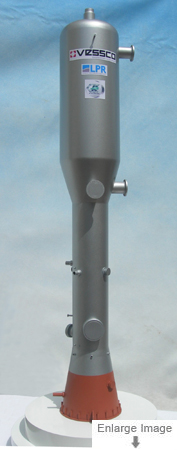
Industrial Model of Scrubbing Column – Scale 1:25
This is a model of an industrial component for the LNG gas processing industry. It’s actually called a “Scrubbing Column” and the real thing is over 25 metres tall and 3 metres wide at the base. At this scale (1:25) it’s about a metre tall. When the client commissioned the model we came up with the idea of putting it on a circular turntable base so that the model could be rotated to be viewed from all sides. We also gave it a tubular Perspex cover to tie in with the turntable and to reflect the cylindrical proportions of the model.
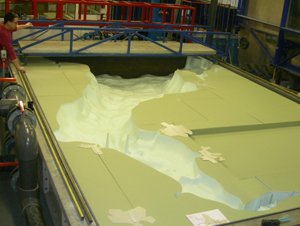
River Bed Model in Fibreglass – Horizontal Scale 1:125,000, Vertical Scale 1:125
Commissioned by Cardiff University’s Engineering Department, this 6 metre x 4 metre fibreglass model of the River Severn Estuary and Bristol Channel river beds was a very technically demanding job, not just because of the huge volume of complex data involved but also because of the sheer size of the project. Comprising several large sections that bolted together, it had to be an accurate representation of the riverbed contours (at an exaggerated vertical scale) because it was being used for physical experimentation in a major research program on tidal power generation.
How we made it
The first stage was to create a “mirrored” negative (upside down and back to front) version of the river bed contours all the way from Gloucester, down the Bristol Channel as far as the open sea. This comprised six major sections and several smaller, infill sections. These contours were made from laser cut acrylic layers supported on an MDF substructure, all fixed onto a structural base board with upstanding sidewalls. To construct the accurate depths and contours we had to create our own CAD masterplan using a combination of traditional Admiralty Charts, CAD contour maps, reams of numbers giving spot depths, and numerous sections through the river bed at key areas.

Once the basic structures of the moulds were built, the contours then had to be blended into a smooth continuous “land-form” using various filling techniques. At the same time great care had to be taken to ensure the contours matched perfectly across the joins between the sections. The contours then had to be sealed and “polished” to a fine finish so that the fiberglass forms would come away cleanly from the moulds once they had cured.
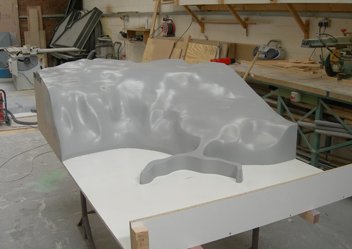
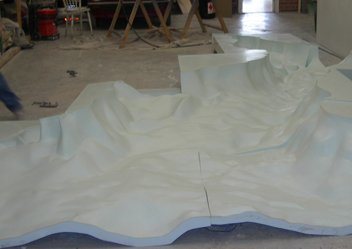
The final stage was to layer up resin and fiberglass matting into the moulds, starting with the “gelcoat” layer (which is in effect the top layer and is the visible finished colour) and then several more layers of resin and matting to build up the structural integrity. The fibreglass sections were then eased out of the moulds and flipped the right way up, ready to be joined together on to a structural sub-frame which supported them all at the right height. The image shows the sections just after they have come out of the moulds. They had been loosely assembled on the floor to check for fit.